Contribute Your Model to Modelhub
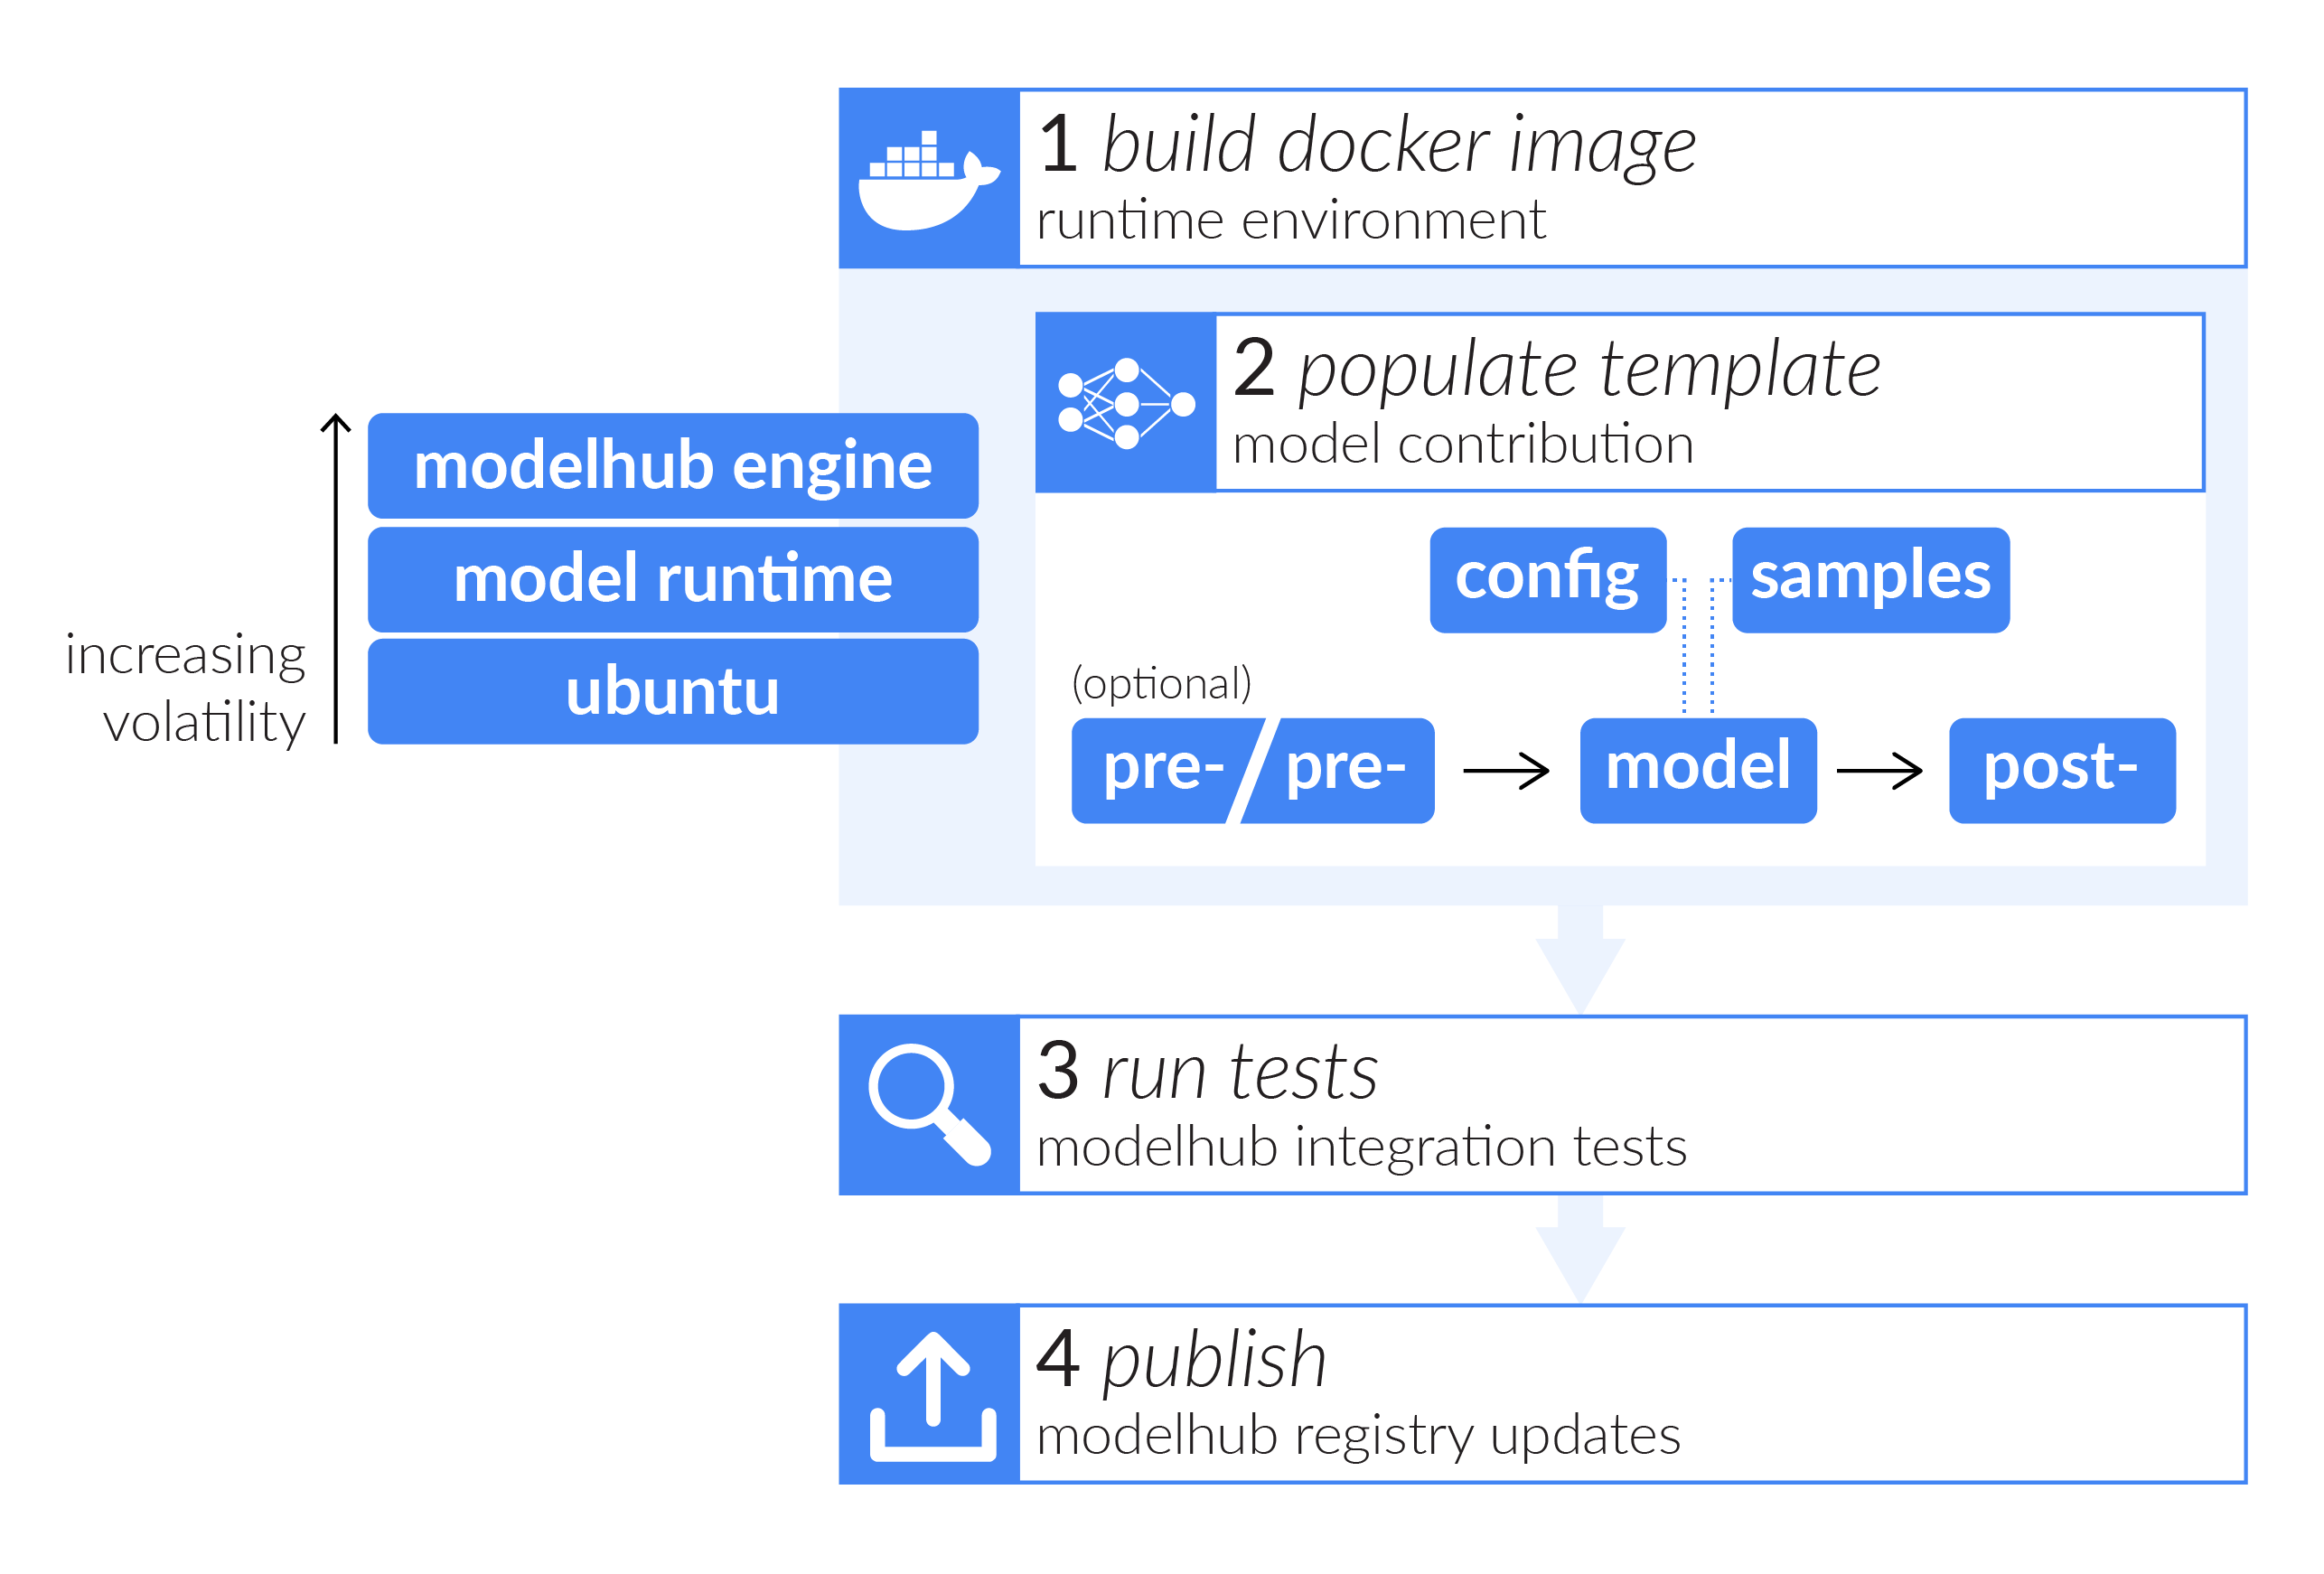
The following figure gives an overview of the necessary steps to package your model with the Modelhub framework and eventually contributing it to the Modelhub collection. Read further for detailed explanations of all steps.
HINT Take a look at an already integrated model to understand how it looks when finished (AlexNet is a good and simple example. If you have a more complex model with more than one input for a single inference, have a look at one of the BraTS models, e.g. lfb-rwth).
Prerequisites
To package a model with our framework you need to have the following prerequisites installed:
- Python 2.7 or Python 3.6 (or higher)
- Docker
- Clone of the modelhub-engine repository (
git clone https://github.com/modelhub-ai/modelhub-engine.git) - For GPU support, you need Docker version >= 19.03 and follow the instructions here.
1. Prepare Docker image
Write a dockerfile preparing/installing all third party dependencies your model needs (e.g. the deep learning library you are using). Use the
ubuntu:16.04Docker image as base. If you want to use CUDA and GPU acceleration, you can also use one of thenvidia/cudaimages as base.You can find examples of dockerfiles for DL environments in the model repositories of modelhub-ai on github (e.g. for squeezenet).
Build the docker image.
Adapt the Dockerfile_modelhub located in the modelhub-engine repository to use your docker image as base (i.e. change the
FROM XXXXXXXXline toFROM <your docker image>). No other changes should be necessary.Build the image from the modified Dockerfile_modelhub. This will include the modelhub engine into your docker. Make sure to build it from within the modelhub-engine repository so it finds the modelhub framework which it will include in the Docker.
Push the image from the previous step to DockerHub (required if you want to publish your model on Modelhub, so the image can be found when starting a model for the first time. If you don’t plan to publish on Modelhub, this step is optional).
NOTE We are planning to provide a few pre-built Docker images for the most common deep learning frameworks, so you do not have to build them yourself. For now we only have a small set. You can find the existing pre-build images on DockerHub - use the ones that end with ‘-modelhub’ (the ones that don’t end with ‘-modelhub’ have only the pure DL environment without the modelhub framework on top.
If the DL environment, the exact version of the DL environment, or third party dependencies you require are not available in the pre-build dockers, you have to build it yourself, following the above steps.
2. Prepare your model based on the modelhub template
Fork the model template.
Change the name of your model-template fork to your model’s name. For this open your fork on GitHub, go to Settings, change the Repository name, and press Rename.
Clone your renamed fork to your local computer and open the cloned folder.
Populate the configuration file contrib_src/model/config.json with the relevant information about your model. Please refer to the schema for allowed values and structure.
Version 0.4 and up breaks the compatibility with older versions of the schema, please validate your configuration file against the current schema if you are submitting a new model. Old models are still compatible anddon’t need to be changed unless you are updating the modelhub-engine version of the Docker image. For single-input models, assign the key"single"to your input as in the schema above.
HINT For more details on how to set up your model for various input scenarios and implement your own ImageLoader class, see the IO Configuration documentation.Place your pre-trained model file(s) into the contrib_src/model/ folder.
(optional) Place some sample data into the contrib_src/sample_data/ folder. This is not mandatory but highly recommended, so users can try your model directly.
Open contrib_src/inference.py and replace the model initialization and inference with your model specific code. The template example shows how to integrate models in ONNX format and running them in caffe2. If you are using a different model format and/or backend you have to change this.
There are only two lines you have to modify. In the
__init__function change the following line, which loads the model:# load the DL model (change this if you are not using ONNX) self._model = onnx.load('model/model.onnx')
If your model receives more than one file as input, the
inputargument ofinferis a dictionary matching the input schema specified inconfig.json. You would then need to pass each individual input through the preprocessing and to your inference function. For example, accessing the inputimage_posewould look like this:input["image_pose"]["fileurl"].
In theinferfunction change the following line, which runs the model prediction on the input data:# Run inference with caffe2 (change this if you are using a different DL framework) results = caffe2.python.onnx.backend.run_model(self._model, [inputAsNpArr])
Note Feel free to add functions to the Model class as needed to structure your model’s initialization and execution code. But make sure to keep the pre- and post-processing of the input data and prediction results (done by the ImageProcessor) as they are. In the next step you will implement the ImageProcessor.
Open contrib_src/processing.py to implement the ImageProcessor class. The ImageProcessor inherits from ImageProcessorBase, which already has most of the required data I/O processing implemented. Just your model specific pre- and post-processing has to be implemented, to make the ImageProcessor work. There are two pre-processing functions and one post-processing function to be filled in. We’ll go through each of these functions individually:
_preprocessBeforeConversionToNumpy(self, image)
The ImageProcessorBase takes care of loading the input image and then calls this function to let you perform pre-processing on the image. The image comming into this function is either a PIL or a SimpleITK object. So _preprocessBeforeConversionToNumpy gives you the option to perform pre-processing using PIL or SimpleITK, which might be more convenient than performing pre-processing on the image in numpy format (see next step). If you decide to implement pre-porcessing here, you should implement it for both, PIL and SimpleITK objects. Make sure this function returns the same type of object as it received (PIL in => PIL out, SimpleITK in => SimpleITK out).
You do not have to implement this. You can delete this function and implement all your pre-processing using the image converted to numpy (see next step).
_preprocessAfterConversionToNumpy(self, npArr)
After the image has passed through the previous function, it is automatically converted to a numpy array and then passed into this function. Here you must implement all additional pre-processing and numpy re-formating necessary for your model to perform inference on the numpy array. The numpy array returned by this function should have the right input format for your model (the output of this function is exactly what is returned by
self._imageProcessor.loadAndPreprocess(input)in contrib_src/inference.py).computeOutput(self, inferenceResults)
This function receives the direct output of your model’s inference. Here you must implement all post-processing required to prepare the output in a format that is supported by Modelhub.
You can either output a list of dictionaries, where each dictionary has a “label” element, giving the name of a class, and a “probability” element, giving the probability of that class. For example:
result = []
for i in range (len(inferenceResults)):
    obj = {'label': 'Class ' + str(i),
           'probability': float(inferenceResults[i])}
    result.append(obj)
For this you have to specifiy the output type “labellist” in your model’s _config.json.
Or you can output a numpy array. The output type specified in model’s config.json will help users (and Modelhub) to interpret the meaning result array:
Name Description File type label_list probabilities json contour_2d A list (or lists) of [x,y] coordinates identifying the contour of a mask. json contour_3d A list (or lists) of [x,y,z] coordinates identifying the contour of a mask. json vector 1d h5 mask_image 2d or 3d, discrete values. 0 is always background, 1,2... are the regions h5 heatmap 2d grayscale, 2d multi, 3d grayscale, 3d multi. If normalized, 1 is highest, 0 is lowest h5 image 2d grayscale, 2d multi, 3d grayscale, 3d multi h5 custom none of the above -
Edit init/init.json and add the id of your Docker, so when starting your model, Modelhub knows which Docker to use (and download from DockerHub).
Optionally also list any additional files that are hosted externally (i.e. not in your model’s GitHub repository). Specify origin and the destination within your model’s folder structure. This is particularly useful for pre-trained model files, since they can easily be larger than the maximum file size allowed in a GitHub repository.
When starting a model, Modelhub will first download the model’s repository, then download any external files, and then start the Docker specified in this init file.
Add your licenses for the model (i.e. everything in the repsoitory except the sample data) and the license for the sample data to contrib_src/license/model and contrib_src/license/sample_data respectively.
If you want to publish your model via Modelhub, make sure the licenses allow us to use your code, model, and sample data (most of the popular open source licenses should be fine, for proprietary licenses you might need to give Modelhub and its users explicit permission).
(optional) Customize example code in contrib_src/sandbox.ipynb. This jupyter notebook is supposed to showcase how to use your model and interpret the output from python. The standard example code in this notebook is very basic and generic. Usually it is much more informative to a user of your model if the example code is tailored to your model.
You can access and run the Sandbox notebook by starting your model via
python start.py YOUR_MODEL_FOLDER_NAME -e. For this, copy start.py from the modelhub repository to the parent folder of your model folder.It is good practice to include the Dockerfiles your used to build the Docker for your model so other users can comprehend what the Docker contains. Create a folder dockerfiles/ in your local model clone (next to contrib_src/ and init/) and copy the files from steps 1.1. and 1.3. into this folder.
3. Test your model
Manually check if your model works.
- Copy start.py from the
modelhub repository to the parent folder of your model folder.
- Run
python start.py YOUR_MODEL_FOLDER_NAMEand check if the web app for your model looks and works as expected. TODO: Add info on how to use the web app, because the command just starts the REST API, which the web frontend is accessing.
NOTE If your code uses CUDA on a GPU, you have to add the-gflag tostart.pyto enforce the use of the GPU version of Docker. This is only required for testing, once your model is added to the index, the right mode (GPU or CPU) is automatically queried. Runpython start.py -hfor more info. - Run
python start.py YOUR_MODEL_FOLDER_NAME -eand check if the jupyter notebook contrib_src/sandbox.ipynb works as expected.
- Copy start.py from the
modelhub repository to the parent folder of your model folder.
Run automatic integration test. This test will perform a few sanity checks to verify that all the basics seem to be working properly. However, passing this test does not mean your model performs correctly (hence the manual checks).
Copy test_integration.py from the modelhub repository to the parent folder of your model folder.
Run
python test_integration.py YOUR_MODEL_FOLDER_NAME. If all tests pass you are good to publish.On some platforms and Docker daemon versions communication to the model’s Docker container might fail if the Docker is started implicitly by the integration test. If you get obscure errors during test, try starting your model idependently in a different terminal via
python start.py YOUR_MODEL_FOLDER_NAMEand running the test with the “-m” option:python test_integration.py YOUR_MODEL_FOLDER_NAME -m.If your model needs particularly long to start up, you need to tell the integration test how long to wait before attempting to communicate with the model. Use the “-t” option.
Check out the documentation of the integration test by calling
python test_integration.py -h
4. Publish
git clone https://github.com/modelhub-ai/modelhub.git(or update if you cloned already).- Add your model to the model index list models.json. If your model needs a GPU to run, add
"gpu" : trueto the parameters for your model. This tells the start script to run the model with GPU acceleration. - Send us a pull request.